Welcome to the International Class Association website for the RS Aero. Here you will find all there is to know about the RS Aero including the latest news, how to register your boat, and links to relevant documents.

| Home >> General Discussion >> General RS Aero purchase comments for the older sailer |
03/10/2019 21:00:00
Posts: 0
The trolley is my own design, made from aluminium section and has lasted the season without any problems. It’s light enough to be picked up with 1 hand which makes solo launching easier. It’s a gunwale hung, a similar idea to some of the “dolly†type designs used in the US. As well as the portability, the cost was about half of a pre-built trolley but took a couple of weekends to get right.
Answering your question, yes it’s proven to be strong enough and sadly not for sale.
Reply
Reply
30/09/2019 22:38:00
AquaNought
Posts: 14
29/09/2019 19:02:00
Posts: 0
Glad it was a useful write up. I would think strapping on the trolley would be easy. However I use a collapsible trolley myself which folds up and straps to the side.
The vertical supports have slots in them that are very useful for tie-downs. As you tighten a strap, the force that might squeeze or crush the hull is taken by the rack, leaving only the downwards forces acting on the dinghy (& trolley).
Reply
Reply
24/09/2019 23:30:00
AquaNought
Posts: 14
Great report - thanks! The Karitek looks very handy - would it be practicable to strap an RS Aero standard trolley upside down to the apparatus before lifting?
Reply
Reply
22/09/2019 18:14:00
Posts: 0
Report on Karitek sidelift for Aero - TLDR makes car topping a doddle !
Apologies for taking so long to post a review of the Aero lift, family stuff got in the way so progress was a bit slow. However I have now assembled and tried the lift and it has been a big success. Below are some notes with a few images.
The product
This is a very robust roof lift system made from substantial aluminium extrusions. It can take over 100kg which is probably in excess of the roof load limits of many cars. I forgot to take a picture of the package as shipped, but only final assembly to your car roof is required. Here's a pic of it on my car, rack system extended.
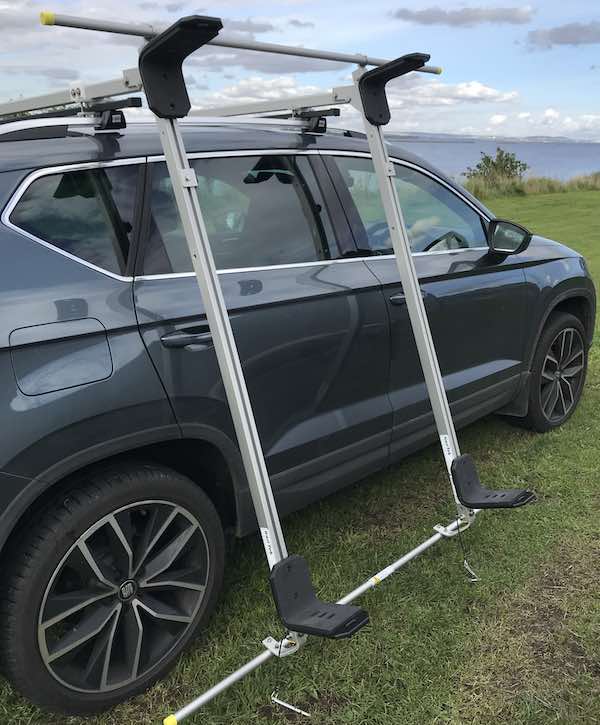
The 2 rails come assembled and comprise a rigid ally track and rollers. When extended as shown 2 substantial brackets hold the extended frame at an angle and prevent contact with the car. You can adjust the height and distance to suit your vehicle. When retracted the slides are secured by 2 large spring loaded pins, I can't see them giving way during a motorway drive.
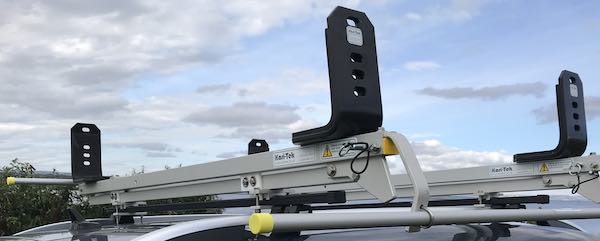
The rack attaches to standard roof bars, Karitek have a range of clamps to suit most cars and rack types.
Assembly
Allow 1-2 hours to put the rack system together. There is not much to do, but you will need to measure up your roof bars and the centres of the racks to get everything aligned. I found it easiest to put my roof bars on first and measure the centres, most cars will have different widths front & back. Then it is a matter of measuring the centres of the roof system racks and attaching them to the roof bars, I marked them 'front' and 'rear' for future reference. It was easier to assemble everything with the roof bars off the car, and then attach the whole assembly to the car. As it is all aluminium weight is not an issue and they are not that unwieldly. Finally you will need to attach the brackets and cross bars which lock everything together and make a nice rigid package.
Taking the system off the roof is now a matter of minutes, take the bracket/cross bar assemblies off first, just 4 bolts to undo, and then remove the roof bars & rails assemblies. Putting it back on is just the reverse so you do not need to drive around with a lot of drag on your roof between transporting your dinghy.
Racking up an Aero
This is the easy bit ! I ease my Aero off its trolley and let the gunwale rest on the bracket as shown. The brackets are tough plastic and thick foam so there is no risk of damage.
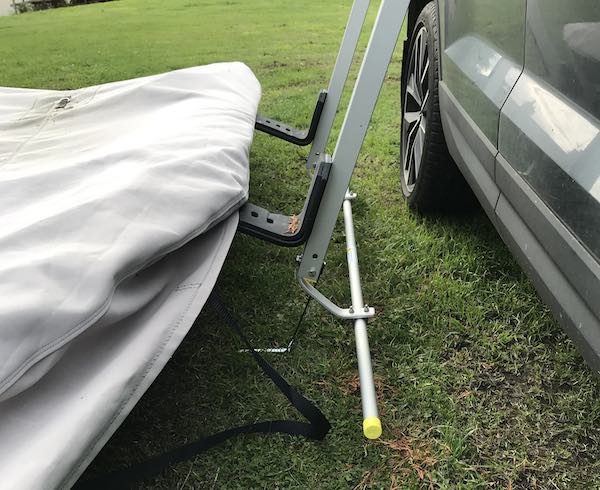
Getting the CofG right is important, I position the front support about the point where the hull starts to taper to the bow. Next lift the opposite side and the Aero easily rotates over the vertical to rest in the supports. The rack is rigid so this works very well, the end result is as per this image.
I use 2 elastic rack straps just to hold the Aero in place, although it is very stable.
At this point I place the spars under the hull onto the rack, although there is room for them on the side and in the future I will probably clip the spars in place before the lifting the hull on.
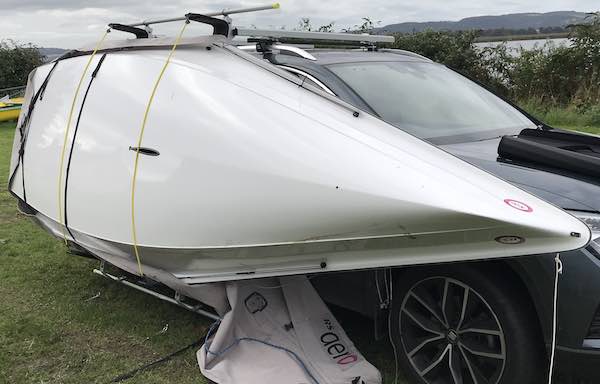
To complete the operation lift the lower bar to waist height, you are only lifting half the weight, it is very easy. Once at waist height start to walk the frame towards the car, it rolls along the fixed rack very smoothly and is rigid enough not to want to twist and jam. At this point the rack system is doing the lifting, you just push until the Aero is about half on and then gravity takes over and the rack/aero drops onto the rails to be slid and locked in place as shown in this image.

I was time limited when taking images which is why the cover was not properly secured ! Getting the Aero off is just the reverse, no huffing and puffing and no arm/back strain. I expected the system to work well, but was surprised at how easy & speedy it proved, no comparison with the lengthy and sweaty method of pushing the Aero over the back of the car.
Conclusion
This is not a cheap system, but considering the cost of an Aero and the cost of damage repairs it is worth it, and it is a very easy and reliable way of transporting an Aero on a car roof. Much easier than trailering and great for getting about to events. I have the 1.6m wide version which I would say is the right size, you can buy the rack direct from the designer/manufacturer at www.karitek.co.uk , I would recomend giving the owner, Anne, a call on +44 1292 571 019. She will ask what car/rack you are using and advise which rack fitting kit you need, they ship all over the world.
Shame the season is almost over, but I now have a great way to get about and hopefully join in some Aero fun around the UK.
Reply
11/09/2019 15:56:00
AquaNought
Posts: 14
“Is it hard to right after capsizing ?â€
Finally pushed hard enough to capsize this week. The hull floats quite high and was not showing signs of wanting to turtle. I righted just by hanging of the dagger board and the boat came up nice and steadily. I probably could have speeded things up by pushing on the gunnale. Once upright I swam round and pulled myself in over the transom using the toe-strap. I found it very easy, not a huge amount of effort and it took just a few seconds to get organized and sail on.
Overall nothing to worry about, not requiring much strength or effort to right and get back on board.
Reply
Reply
23/08/2019 19:07:00
AquaNought
Posts: 14
I went to see the side lift device & was impressed. Took one away, it comes as a kit and the supports are being sent to me. I hope to assemble next week and will report back after loading my Aero.
Reply
Reply
23/08/2019 19:00:00
AquaNought
Posts: 14

20/08/2019 17:05:00
Hairsy
Posts: 44
Hi Mike & Dave,
Just to let you know I am going to view the karitek system in a few days and likely to buy. It can take a load of 75kg+, the limiting factor is more likely the car roof limit. An Aero with spars will be well within limits. The company is not aware of any Aeros using this rack, but has several being used to transport Mirror dinghies. Not the length of an Aero, but certainly the beam & weight. They recommend the “open†style of support rather than “J†bars to hold the boat on the side. Apparently the height off the ground in the side position can be adjusted to suit the car & user. I’ll report back when I have seen the unit & tried it out - probably a few days before I can get to one.
Best
Dominic
Reply
Reply
20/08/2019 16:51:00
AquaNought
Posts: 14
Hi
I would be very interested to know how you get on with the side lift system. I have never dared to try putting the Aero on my car roof.
Reply
Reply
16/08/2019 09:42:00
Mike0rea
Posts: 58
Hi Dave,
I did look at Peter's method, but having decided to design/build my own collapsible trolley I went in a different direction. I use the bak-rak base towbar mount from this company and built a simple "T" frame out of CLS with a couple of cheap conveyer rollers (available from Amazon, RadioSpares etc) mounted on the towbar. The "T" frame is just a bit below my roof bar height and has a short length of line with a clip. I lift the bow of my Aero up to line/clip and hook on. Then head to the stern, lift and gently rotate the hull - I've now got the hull inverted. Return to the bow and lift onto the rollers, and then back to the stern to lift and push over the rollers to get the Aero onto the roof bars. I find this less of a lift than Peter's method and my car is well protected. Getting the Aero off is the reverse of the above and I have a couple of cheap cushions on the ground to rest the boat on. With Peter's method I found it took more effort to get the boat on my car, and my car rear roof geometry was such that the Aero was resting on it too much. The frame cost me about £25 in total, I bought the winch bak-rak as this had other uses for me.
This has worked well for me over the past number of weeks, but I am looking at this side lift system as a longer term alternative. It's a bit pricey so I wanted to make sure the Aero was going to work for me before spending more cash on a rack system with no other use. I'm still checking the specs to make sure it can take the Aero hull weight, but it looks OK at the moment. I have been told that there are a few Aero sailers already using this.
Reply
15/08/2019 23:18:00
AquaNought
Posts: 14
Incredibly helpful and useful post. Thank you.
Can you share any more info about your single handed car-top technique. I currently use the Peter Barton technique (thats it's official name isn't it?) but I'm interested if you've got any additional tips / techniques, including inverted.
Thank you
Dave
Reply
Reply
15/08/2019 19:14:00
Hairsy
Posts: 44
This is a long post, apologies, but I wanted to put everything in this post I would have liked to have known before buying an Aero - this is a post for beginners and older prospective buyers.
I’ve written this post for sailers like me, who’ve been lurking round the forum & social media trying to work out if sailing an Aero is a realistic option. You had some dinghy experience in your youth and now later on in life you find yourself with a bit more time and a lot more waistline, perhaps kids have left home or you have retired and are thinking about getting back into sailing to get some enjoyable exercise. The Aero has taken your fancy and while most of the reports and footage look exiting, the protagonists are either super-fit youngsters or more mature multiple championship winners. The Aero is a lot of money to spend if it proves too much to handle, not to mention the embarrassment of failure. Other family members may be pointing out you can get fitter on a decent bike for a tenth of the cost of an Aero !
This was my dilemma, but I went for it and I’ve noted my initial learnings below. TLDR - go for it !
There is a lot of great help on this forum, but I found much of it focused on race performance and tuning. These notes are for those looking to get into the Aero and perhaps do some club racing, but not (yet) bothered about serious competition. There are clearly some Aero sailers well into retirement, but also a few posts of those finding the boat a bit too much.
My comments below are based on some initial sails and while written from the perspective of a middle aged bloke & very average club sailer, I think can apply to all genders. This about being able to enjoy sailing an Aero without feeling overwhelmed, embrace the challenge of learning to get the best you can out of the boat and regain a bit of fitness.
Build, commissioning & rigging
No need to repeat what has been written before, all the good stuff about build quality & lightness is true. RS were excellent to deal with from initial advice, progress updates after ordering and a very helpful & easy collection process. Their reputation for great customer service is well deserved.
The boat is delivered requiring final assembly and rigging, it does not come “ready to sail” and I suggest you allow half a day to complete the work. It’s not that difficult and requires no special tools.
The latest build manual is a bit of a work in progress, misses a couple of steps & the bag of parts you get do not exactly match the text in the manual. The ropes are nicely labeled and I found it easier to work through the sections on spars & foils first and then figure out where the remaining items went on the hull. Take a bit of time, it isn’t too hard to work it out & you learn a lot about the boat in the process. When I assembled my Aero a few weeks ago the manual missed the downhaul line, which needs to be attached to the control line block. The tail feeds through the block, not just a knot at the top (this can jam the downhaul at times if not attached properly).
There are 4 shock blocks on 2 strops to lead the outhaul & downhaul control lines which have a lot of slack and I found running a line around the bow to tension the strops made for a much better sail.
There are a number of blocks at the base of their mast and it is easy to get the downhaul & kicker lines overlapped and have a jam at a very inconvenient moment. The kicker block needs to sit between the downhaul lines, I rig the kicker line from mast block to cleat last to make sure it runs free. I try to take a couple of minutes before launching to look closely at the control lines and make sure everything is in its place & can run free.
I would recommend both a masthead and lower wind indicator, and some extra 3mm shock cord around the mast to help release the outhaul & downhaul (lots of forum posts on this to show how). Otherwise the boat as delivered is perfect.
“I’m not fit enough”
This was one of my big concerns as a modestly fit type. I would say stamina is more important than out-and-out fitness. If the idea of a moderately brisk 5 mile walk or cycle ride followed by an hour or two of gardening is not too daunting then in my opinion you are fit enough to get something out of an Aero. If you want something more scientific the RYA have some guidelines on fitness based on measured performance on a rowing machine. The tests have 5 possible levels where level 5 is pretty much Olympic level and level 1 is the lowest. If you want to try this get some proper advice on using a rowing machine as technique is important and you can seriously injure yourself if you just blast away. I would say if you are reasonably close to the level 1 threshold you are fine for an Aero and if you can get into the level 2 zone you are looking good. Note that there are 2 tests, one for youngsters and one for the more mature - make sure you do the right one !
Control loads are very manageable (I would say noticeably lower than comparable classes), you do not need massive arms/shoulders to apply the sail controls or main sheet. I also sail a larger more stable dinghy where the main sheet cleat is a necessary feature, but I come in after a couple of hours in the Aero without any arm ache. I would not bother getting the main sheet cleat options if you buy an Aero, you can always add them later if required (and the cheaper deck cleat option is going to get in your way - you need to sit there in lighter airs).
“I’m not flexible enough”
The Aero responds well to body position and expect to have to move about the cockpit. Invest in some good knee pads, I use mountain bike pads over my wetsuit as they stay in place far better than those sold for sailing. A mis-spent youth playing rugby has left me with a slightly iffy knee & shoulder, but I still find I can move around quite happily and fast enough to stay more or less upright. When rigged the boom has a significant upward cant, but for many sailing scenarios the boom will be pretty much level with the deck, and you should be sitting well forward so the ability to bend/duck is important. I can confirm that a lightweight carbon boom bounces off my skull with significantly less trauma than an aluminium version. However best to duck in the first place ...
The Aero is not going to work for you if you just want to sit out a bit, you need to be happy kneeling and the sitting position is comfortable but slightly crouched. Moving between kneeling and sitting needs to happen moderately quickly, I would avoid if you have fairly significant joint issues, general stiffness or back trouble. However you do not need to be a gymnast to have an enjoyable sail.
“I’m worried about hiking”
I have sailed several single handler dinghies recently of a similar size and shape to the Aero and they all aggravated my knees when hiking, I just could not get comfortable. The Aero, on the other hand, has excellent ergonomics where the controls fall more or less naturally to hand and the hull shape encourages efficient hiking. Of course hiking is never going to be easy or pain-free, but instead of having to stop due to knee pain, at the end of a sailing session only my leg /stomach muscles are aching. The Aero is a hiking dinghy and you do need to be able to hike out to get an enjoyable sail. However ignore the sales blurb showing high speed reaches with the helm straight-legged & flat-stomached out of the back, leave that to the pro’s as you can still enjoy some sparkling performance with less aggressive hiking in a decent blow with some chop.
“It’s a really tippy looking boat”
It really isn’t, and believe me I have thoroughly tested my Aero’s limits of stability already. It does respond to gusts very quickly (exciting at times) but I have managed to retain control, the harder part is when the gust disappears and the boat pretty much stops - you have to get in quickly in these conditions. Be ready to play the mainsheet. I don’t think the Aero is any more unstable than many other single handler dinghies. In fact much to my amazement I have yet to capsize (at the time of writing anyway). I can get in over the side when launching/docking without any drama, and you can come in over the low transom if you prefer. The rudder is an inviting handhold which should be ignored as it is carbon and not up to body weights loads at the tip. The rudder stock is an aluminium casting and an ideal hold point/support.
“What rig size”
This RIG SELECTION GUIDE produced by the Class Association is invaluable - kudos to the authors and contributors . I probably would have got a 9 rig based on the brochure and spec sheets, but this persuaded me that a 7 rig would be a better option - absolutely correct, I would have struggled with a 9. Fitness is a parameter and from my comments above using the RYA rowing test the “low fitness” level would (in my opinion) be somewhere approaching the level 1 threshold and medium fitness into the level 2 band - these are using the RYA rowing machine tests mentioned above. I’ve no idea about high fitness, maybe we need to get Peter Barton hooked up to an ECG/VO2 Max rowing test rig for a day to find out ! You can still have a lot of fun with a 5 rig even if you are theoretically oversized for it. You can always buy a larger rig next season.
“I'm new to sailing, could it be a first boat?”
I’ve had several people stop and ask about the Aero when I’m rigging for a sail, and whether they could have it as a first boat. In many cases they are older, even retired, and looking for a new athletic experience - sailing appeals. With the proviso of joining a club and getting some proper instruction in another dinghy first, I would say it is very much a boat you could learn to sail and race in without getting frustrated or injured, just be patient, start in light winds and with a sensible rig size.
Car top-ability
Big win here. I can, without much effort, get the Aero onto my roof rack solo. I prefer to car top inverted as it is more wind efficient and I have a collapsible launching trolley. I use the tyvek delivery cover for shorter journeys, some decent padding on the roof bars, leave the sail in the hull and push the spars onto the rack one the boat is loaded. Strap down firmly but not over-tight, just enough to secure the hull. I’m confident that I’ll be car topping the Aero for many years to come, and the great thing is I can still put a bike rack on the back for weekends away, meaning those in the car not interested in sailing can do their own thing. It is so much easier than trailering.
Durability
It is a stiff and strong boat, but the lightness does come with a cautionary note. This type of hull construction does not like point loads, so be careful when coming ashore as sailing into rocks or a gravel bed could easily punch a hole in the hull. Similarly dropping heavy items on the hull will leave dents. With some care this is a boat that should have a good long life and at least RS have a decent and well stocked online spares store.
Class rules
My prior experience had been with one-design dinghies that allowed a degree of freedom in controls routing, setup and in some cases spar choice. The Aero is much more restrictive as a “closed class” so spend the time and read the class rules. Assume your Aero will only be race legal in the “as delivered” condition. The rules do allow a small number of very specific modifications, but as a general rule do not screw or glue anything at all to any part of the boat. I use white gaffer tape to cover a few parts of the hull where blocks are resting on the surface of the gel coat to prevent wear - I think this is OK, the tape could easily be removed. I have changed a few of the line routes to help me adjust controls from different positions and I have made sure that any new blocks are only attached using rope to existing fittings and they can be removed in the future leaving no trace.
Clearly if you are buying an Aero for recreational use only do what you like, but if you think you might want to race in the future or need to preserve second hand value I would stick to the class rules.
Sailing notes
This is based on just a few sails, I’m still learning but this is what stood out for me.
The rudder is very lightly loaded and powerful. On my first launch it looked like I was taking evasive action to avoid an imminent torpedo attack (or so I was told - naturally I felt completely in control). Be prepared to make small movements to correct your course, but you will need a decent swing to tack or gybe. Once you get used to it, the rudder is wonderfully responsive.
The tiller extension is quite long and easy to trap in the main sheet falls, or in my case a hat strap (disentangled 2 gybes later, no capsize !). After a few sails you’ll get used to it and how to manoeuvre without getting tangled. I find leading with the extension when tacking/gybing works well while facing forward. I believe some experts think you can tack better facing backwards - I tried this only once…
Gust response is immediate and very impressive, the Aero just takes off. I’ve sailed a fair few dinghies and have never had quite this level of response - but as Aero is so much lighter it shouldn’t be a surprise. You need to be alive to this and I ended up pulling the daggerboard up about 20% to alleviate the gust response/heeling at the expense of some sideways drift while I got my act together. I’ve mentioned above the counter effect of suddenly stopping as the gust passes and needing to get in quickly. This is for a F3 gusting F5.
In light airs when running you need to be uncomfortably forward, right on the deck and this is a bit tricky with the daggerboard and controls. This is one area where you need to be a bit of a gymnast and I have settled for some transom drag and a more comfortable position for now by draping my upper body on the forward anti-slip. When running it can get a bit squirrelly very quickly so I leave about 30% daggerboard down for a bit more stability & am prepared to put more down.
In light airs pull on the outhaul to reduce the sail draft, it makes a big difference.
I find downhaul and kicker are the most effective sail tuning aids and they work together, the outhaul seems to have little effect other than light airs, but it is very early days and I am a long way off sailing my Aero to any level of competence. I use lots of kicker upwind, about half kicker on a reach and just a light tension when running. Downhaul is adjusted to suit the wind conditions and depower when necessary. I apply kicker first and then downhaul immediately after, and be prepared to change settings significant as you change between upwind and downwind modes. I find these simple rules are sufficient to get an enjoyable sail in, but in club racing I’m going to need to up my game significantly to have some success (I’m the only Aero at the club so it is handicap racing for me). The kicker initially powers up the sail as it tightens the leech and then gets to a point where the flattening effect takes over and the sail depowers. It took me a few sails to get used to this and the fairly significant amount of kicker that needs to be applied to power up. Having got to a base level, I know find I have the spare capacity to keep one eye on the tell tails to fine tune.
The daggerboard is also an important tool and it is worth trying it in various positions. The cutaway at the bottom is very interesting as it means you can run with just a small amount of board for stability and not that much drag. Same applies to reaching and beating.
I find I spend most of the time sitting at the front of the cockpit to minimise transom drag, not always successfully, and this is definitely a work in progress. Recently I tried hiking slightly diagonally forward with a modest improvement. I use an app called Yonav on my iWatch which uses the built-in watch GPS to track speed, position etc. It works without a ‘phone so you only need the watch on the water and can download the tracks for later analysis - I find it useful.
I’ve sailed both inland and coastal and both are great, sailing through chop or breakers is not that traumatic and launching from a beach, ramp or jetty is straightforward regardless of wind direction. It is easier to recover onto the trolley when facing into wind, due to the lightness of the hull.
Final thoughts
I’m now one of many enthusiastic Aero sailers. It really is a recreational boat for all abilities, genders and ages and you do not need to be a super-fit star-sailer to spend a few hours on the water and come ashore with a big smile (& maybe a bit tired & hungry). One caveat: it is a dinghy that requires a degree of attention on the water and I would not recommend it as a “beach boat” for a casual sail. A friend tried mine for a day with this in mind and it was too much effort, not a boat you can stretch out in & chill out. Club racing is fun, but if competition is not your thing, blasting about in an Aero and maybe dropping onto a beach for a break & a snack is also a great way to spend a summers evening.
Reply
I’ve written this post for sailers like me, who’ve been lurking round the forum & social media trying to work out if sailing an Aero is a realistic option. You had some dinghy experience in your youth and now later on in life you find yourself with a bit more time and a lot more waistline, perhaps kids have left home or you have retired and are thinking about getting back into sailing to get some enjoyable exercise. The Aero has taken your fancy and while most of the reports and footage look exiting, the protagonists are either super-fit youngsters or more mature multiple championship winners. The Aero is a lot of money to spend if it proves too much to handle, not to mention the embarrassment of failure. Other family members may be pointing out you can get fitter on a decent bike for a tenth of the cost of an Aero !
This was my dilemma, but I went for it and I’ve noted my initial learnings below. TLDR - go for it !
There is a lot of great help on this forum, but I found much of it focused on race performance and tuning. These notes are for those looking to get into the Aero and perhaps do some club racing, but not (yet) bothered about serious competition. There are clearly some Aero sailers well into retirement, but also a few posts of those finding the boat a bit too much.
My comments below are based on some initial sails and while written from the perspective of a middle aged bloke & very average club sailer, I think can apply to all genders. This about being able to enjoy sailing an Aero without feeling overwhelmed, embrace the challenge of learning to get the best you can out of the boat and regain a bit of fitness.
Build, commissioning & rigging
No need to repeat what has been written before, all the good stuff about build quality & lightness is true. RS were excellent to deal with from initial advice, progress updates after ordering and a very helpful & easy collection process. Their reputation for great customer service is well deserved.
The boat is delivered requiring final assembly and rigging, it does not come “ready to sail” and I suggest you allow half a day to complete the work. It’s not that difficult and requires no special tools.
The latest build manual is a bit of a work in progress, misses a couple of steps & the bag of parts you get do not exactly match the text in the manual. The ropes are nicely labeled and I found it easier to work through the sections on spars & foils first and then figure out where the remaining items went on the hull. Take a bit of time, it isn’t too hard to work it out & you learn a lot about the boat in the process. When I assembled my Aero a few weeks ago the manual missed the downhaul line, which needs to be attached to the control line block. The tail feeds through the block, not just a knot at the top (this can jam the downhaul at times if not attached properly).
There are 4 shock blocks on 2 strops to lead the outhaul & downhaul control lines which have a lot of slack and I found running a line around the bow to tension the strops made for a much better sail.
There are a number of blocks at the base of their mast and it is easy to get the downhaul & kicker lines overlapped and have a jam at a very inconvenient moment. The kicker block needs to sit between the downhaul lines, I rig the kicker line from mast block to cleat last to make sure it runs free. I try to take a couple of minutes before launching to look closely at the control lines and make sure everything is in its place & can run free.
I would recommend both a masthead and lower wind indicator, and some extra 3mm shock cord around the mast to help release the outhaul & downhaul (lots of forum posts on this to show how). Otherwise the boat as delivered is perfect.
“I’m not fit enough”
This was one of my big concerns as a modestly fit type. I would say stamina is more important than out-and-out fitness. If the idea of a moderately brisk 5 mile walk or cycle ride followed by an hour or two of gardening is not too daunting then in my opinion you are fit enough to get something out of an Aero. If you want something more scientific the RYA have some guidelines on fitness based on measured performance on a rowing machine. The tests have 5 possible levels where level 5 is pretty much Olympic level and level 1 is the lowest. If you want to try this get some proper advice on using a rowing machine as technique is important and you can seriously injure yourself if you just blast away. I would say if you are reasonably close to the level 1 threshold you are fine for an Aero and if you can get into the level 2 zone you are looking good. Note that there are 2 tests, one for youngsters and one for the more mature - make sure you do the right one !
Control loads are very manageable (I would say noticeably lower than comparable classes), you do not need massive arms/shoulders to apply the sail controls or main sheet. I also sail a larger more stable dinghy where the main sheet cleat is a necessary feature, but I come in after a couple of hours in the Aero without any arm ache. I would not bother getting the main sheet cleat options if you buy an Aero, you can always add them later if required (and the cheaper deck cleat option is going to get in your way - you need to sit there in lighter airs).
“I’m not flexible enough”
The Aero responds well to body position and expect to have to move about the cockpit. Invest in some good knee pads, I use mountain bike pads over my wetsuit as they stay in place far better than those sold for sailing. A mis-spent youth playing rugby has left me with a slightly iffy knee & shoulder, but I still find I can move around quite happily and fast enough to stay more or less upright. When rigged the boom has a significant upward cant, but for many sailing scenarios the boom will be pretty much level with the deck, and you should be sitting well forward so the ability to bend/duck is important. I can confirm that a lightweight carbon boom bounces off my skull with significantly less trauma than an aluminium version. However best to duck in the first place ...
The Aero is not going to work for you if you just want to sit out a bit, you need to be happy kneeling and the sitting position is comfortable but slightly crouched. Moving between kneeling and sitting needs to happen moderately quickly, I would avoid if you have fairly significant joint issues, general stiffness or back trouble. However you do not need to be a gymnast to have an enjoyable sail.
“I’m worried about hiking”
I have sailed several single handler dinghies recently of a similar size and shape to the Aero and they all aggravated my knees when hiking, I just could not get comfortable. The Aero, on the other hand, has excellent ergonomics where the controls fall more or less naturally to hand and the hull shape encourages efficient hiking. Of course hiking is never going to be easy or pain-free, but instead of having to stop due to knee pain, at the end of a sailing session only my leg /stomach muscles are aching. The Aero is a hiking dinghy and you do need to be able to hike out to get an enjoyable sail. However ignore the sales blurb showing high speed reaches with the helm straight-legged & flat-stomached out of the back, leave that to the pro’s as you can still enjoy some sparkling performance with less aggressive hiking in a decent blow with some chop.
“It’s a really tippy looking boat”
It really isn’t, and believe me I have thoroughly tested my Aero’s limits of stability already. It does respond to gusts very quickly (exciting at times) but I have managed to retain control, the harder part is when the gust disappears and the boat pretty much stops - you have to get in quickly in these conditions. Be ready to play the mainsheet. I don’t think the Aero is any more unstable than many other single handler dinghies. In fact much to my amazement I have yet to capsize (at the time of writing anyway). I can get in over the side when launching/docking without any drama, and you can come in over the low transom if you prefer. The rudder is an inviting handhold which should be ignored as it is carbon and not up to body weights loads at the tip. The rudder stock is an aluminium casting and an ideal hold point/support.
“What rig size”
This RIG SELECTION GUIDE produced by the Class Association is invaluable - kudos to the authors and contributors . I probably would have got a 9 rig based on the brochure and spec sheets, but this persuaded me that a 7 rig would be a better option - absolutely correct, I would have struggled with a 9. Fitness is a parameter and from my comments above using the RYA rowing test the “low fitness” level would (in my opinion) be somewhere approaching the level 1 threshold and medium fitness into the level 2 band - these are using the RYA rowing machine tests mentioned above. I’ve no idea about high fitness, maybe we need to get Peter Barton hooked up to an ECG/VO2 Max rowing test rig for a day to find out ! You can still have a lot of fun with a 5 rig even if you are theoretically oversized for it. You can always buy a larger rig next season.
“I'm new to sailing, could it be a first boat?”
I’ve had several people stop and ask about the Aero when I’m rigging for a sail, and whether they could have it as a first boat. In many cases they are older, even retired, and looking for a new athletic experience - sailing appeals. With the proviso of joining a club and getting some proper instruction in another dinghy first, I would say it is very much a boat you could learn to sail and race in without getting frustrated or injured, just be patient, start in light winds and with a sensible rig size.
Car top-ability
Big win here. I can, without much effort, get the Aero onto my roof rack solo. I prefer to car top inverted as it is more wind efficient and I have a collapsible launching trolley. I use the tyvek delivery cover for shorter journeys, some decent padding on the roof bars, leave the sail in the hull and push the spars onto the rack one the boat is loaded. Strap down firmly but not over-tight, just enough to secure the hull. I’m confident that I’ll be car topping the Aero for many years to come, and the great thing is I can still put a bike rack on the back for weekends away, meaning those in the car not interested in sailing can do their own thing. It is so much easier than trailering.
Durability
It is a stiff and strong boat, but the lightness does come with a cautionary note. This type of hull construction does not like point loads, so be careful when coming ashore as sailing into rocks or a gravel bed could easily punch a hole in the hull. Similarly dropping heavy items on the hull will leave dents. With some care this is a boat that should have a good long life and at least RS have a decent and well stocked online spares store.
Class rules
My prior experience had been with one-design dinghies that allowed a degree of freedom in controls routing, setup and in some cases spar choice. The Aero is much more restrictive as a “closed class” so spend the time and read the class rules. Assume your Aero will only be race legal in the “as delivered” condition. The rules do allow a small number of very specific modifications, but as a general rule do not screw or glue anything at all to any part of the boat. I use white gaffer tape to cover a few parts of the hull where blocks are resting on the surface of the gel coat to prevent wear - I think this is OK, the tape could easily be removed. I have changed a few of the line routes to help me adjust controls from different positions and I have made sure that any new blocks are only attached using rope to existing fittings and they can be removed in the future leaving no trace.
Clearly if you are buying an Aero for recreational use only do what you like, but if you think you might want to race in the future or need to preserve second hand value I would stick to the class rules.
Sailing notes
This is based on just a few sails, I’m still learning but this is what stood out for me.
The rudder is very lightly loaded and powerful. On my first launch it looked like I was taking evasive action to avoid an imminent torpedo attack (or so I was told - naturally I felt completely in control). Be prepared to make small movements to correct your course, but you will need a decent swing to tack or gybe. Once you get used to it, the rudder is wonderfully responsive.
The tiller extension is quite long and easy to trap in the main sheet falls, or in my case a hat strap (disentangled 2 gybes later, no capsize !). After a few sails you’ll get used to it and how to manoeuvre without getting tangled. I find leading with the extension when tacking/gybing works well while facing forward. I believe some experts think you can tack better facing backwards - I tried this only once…
Gust response is immediate and very impressive, the Aero just takes off. I’ve sailed a fair few dinghies and have never had quite this level of response - but as Aero is so much lighter it shouldn’t be a surprise. You need to be alive to this and I ended up pulling the daggerboard up about 20% to alleviate the gust response/heeling at the expense of some sideways drift while I got my act together. I’ve mentioned above the counter effect of suddenly stopping as the gust passes and needing to get in quickly. This is for a F3 gusting F5.
In light airs when running you need to be uncomfortably forward, right on the deck and this is a bit tricky with the daggerboard and controls. This is one area where you need to be a bit of a gymnast and I have settled for some transom drag and a more comfortable position for now by draping my upper body on the forward anti-slip. When running it can get a bit squirrelly very quickly so I leave about 30% daggerboard down for a bit more stability & am prepared to put more down.
In light airs pull on the outhaul to reduce the sail draft, it makes a big difference.
I find downhaul and kicker are the most effective sail tuning aids and they work together, the outhaul seems to have little effect other than light airs, but it is very early days and I am a long way off sailing my Aero to any level of competence. I use lots of kicker upwind, about half kicker on a reach and just a light tension when running. Downhaul is adjusted to suit the wind conditions and depower when necessary. I apply kicker first and then downhaul immediately after, and be prepared to change settings significant as you change between upwind and downwind modes. I find these simple rules are sufficient to get an enjoyable sail in, but in club racing I’m going to need to up my game significantly to have some success (I’m the only Aero at the club so it is handicap racing for me). The kicker initially powers up the sail as it tightens the leech and then gets to a point where the flattening effect takes over and the sail depowers. It took me a few sails to get used to this and the fairly significant amount of kicker that needs to be applied to power up. Having got to a base level, I know find I have the spare capacity to keep one eye on the tell tails to fine tune.
The daggerboard is also an important tool and it is worth trying it in various positions. The cutaway at the bottom is very interesting as it means you can run with just a small amount of board for stability and not that much drag. Same applies to reaching and beating.
I find I spend most of the time sitting at the front of the cockpit to minimise transom drag, not always successfully, and this is definitely a work in progress. Recently I tried hiking slightly diagonally forward with a modest improvement. I use an app called Yonav on my iWatch which uses the built-in watch GPS to track speed, position etc. It works without a ‘phone so you only need the watch on the water and can download the tracks for later analysis - I find it useful.
I’ve sailed both inland and coastal and both are great, sailing through chop or breakers is not that traumatic and launching from a beach, ramp or jetty is straightforward regardless of wind direction. It is easier to recover onto the trolley when facing into wind, due to the lightness of the hull.
Final thoughts
I’m now one of many enthusiastic Aero sailers. It really is a recreational boat for all abilities, genders and ages and you do not need to be a super-fit star-sailer to spend a few hours on the water and come ashore with a big smile (& maybe a bit tired & hungry). One caveat: it is a dinghy that requires a degree of attention on the water and I would not recommend it as a “beach boat” for a casual sail. A friend tried mine for a day with this in mind and it was too much effort, not a boat you can stretch out in & chill out. Club racing is fun, but if competition is not your thing, blasting about in an Aero and maybe dropping onto a beach for a break & a snack is also a great way to spend a summers evening.
It is well built and with a bit of TLC I expect my Aero to give me fun afloat for many years to come. The ergonomics are good, it is very portable, there is a range of rig sizes with one more on the horizon, the manufacturer has a good rep and my limited experience of fellow Aero sailers is of a very welcoming & friendly group. Highly recommended not just for out and out racing, but enjoyable exercise.
Feel free to post helpful comments in line with the general theme of this post.
Reply
15/08/2019 12:19:00
AquaNought
Posts: 14